Saturday, June 20, 2015

English Manual for DoCooler Temperature Controller H9745


So I got this temperature controller from Amazon to control the temperature of a freezer. I bought the Farenheit version for about $16.

It's a great little item that I've used a few times to replace freezer thermostats for a beer cooler or fermenter.


But the operating instructions that come with it are pretty bad. Obviously written by a non-English speaker.

The number on the display while it's operating is the current thermostat temperature. So in the picture above, the temperature sensor is at 88.6F.

This controller can be in two main modes:

  • Heat mode - the controller will supply power if the thermostat reads under the set temperature, i.e., you are trying to keep something warm by supplying power to a heating device.
  • Cool mode - the controller will supply power if the thermostat reads over the set temperature, i.e., you are trying to keep something cool by supplying power to a cooling device. 

Not shown on the picture above are two red dots on the far left of the digital display, one to the right of the word Heat, and one to the right of the word Cool.
  • If the Heat light is on it means that the controller is in Heat mode, and the controller is supplying power. (Hey, it's too cool, I'll turn the heat on for you.)
  • If the Cool light is on, it means that the controller is in Cool mode, and the controller is supplying power. (Hey, it's too hot. I'll turn the cool on for you.)
  • If neither the Heat or Cool light is on, the temperature controller is not supplying power. But with no lights, you can't see if it's in Heat mode or Cool mode. It's either in Heat mode and warm enough, or Cool mode and cool enough.

Basic Settings

These are the items to change to get up and running. The defaults for the other settings are generally ok.

Changing from Heat mode to Cool mode

  1. Hold the S or Set key for about three seconds until the display shows HC. Release the key. 
  2. Press and release the S/Set key. H or C should show on the display and blink.
  3. Use the up or down arrows until the mode you want is showing: H or C.
  4. Press and release the S/Set key.
  5. Wait about three seconds. The display should now be showing the current temperature.

Changing the set temperature


  1. Press and release the S/Set key.The display will blink the current set temperature.
  2. Press and release the up or down arrow keys to change the set temperature. If you hold the up or down arrow key for 3 seconds, it will begin to adjust up or down more quickly.
  3. When you are at the temperature you want, wait about three seconds. The display will stop blinking and go back to showing the current thermostat temperature.

Advanced Settings

You might want to change these things depending on your application.

Adjusting the Hysteresis

The pamphlet that comes with the controller calls this the "slewing range of temperature". You can read about hysteresis in control systems on Wikipedia.

This is basically the "slop" around the set temperature to keep the controller from switching on and off too rapidly. The slewing range is in degrees fahrenheit.

Example: Assume you want to keep something at 40F, and the slewing range is set to 2F (the default). Then the temperature controller will not turn on until the temperature rises to at least 42F (40F + 2F). It will turn on, powering the cooling device, until the temperature reads 40F, then turn off. The temperature will likely continue to drop, to, let's say 38F. Then the temperature will start to rise. When the temperature reaches 42F, the controller will turn on again.

To adjust:

  1. Hold the S or Set key for about three seconds until the display shows HC. Release the key. 
  2. Press the up or down arrow until the display shows CP.
  3. Press and release the S/Set key. The current slewing range value will blink (the default is 2, meaning 2F).
  4. Use the up or down arrows until the slewing range value you want is showing: 1-30.
  5. Press and release the S/Set key.
  6. Wait about three seconds. The display should now be showing the current temperature.

Adjusting the Time Delay

The pamphlet that comes with the controller calls this the "delayed start". 
This is similar to the hysteresis - it is used to keep the controller from switching on and off too rapidly. The Time delay is in minutes.

This is the number of minimum number of minutes between the controller turning off, then turning back on again.


To adjust:

  1. Hold the S or Set key for about three seconds until the display shows HC. Release the key. 
  2. Press the up or down arrow until the display shows PU.
  3. Press and release the S/Set key. The current time delay value will blink (the default is 2, meaning 2 minutes between turning off and turning on).
  4. Use the up or down arrows until the time delay value you want is showing: 0-10.
  5. Press and release the S/Set key.
  6. Wait about three seconds. The display should now be showing the current temperature.

Temperature Correction

If you think your thermostat is not correct, you can adjust the controller by plus or minus ten degrees fahrenheit.

To adjust:
  1. Hold the S or Set key for about three seconds until the display shows HC. Release the key. 
  2. Press the up or down arrow until the display shows CA.
  3. Press and release the S/Set key. The current temperature adjustment value will blink (the default is 0.0, meaning there is no adjustment).
  4. Use the up or down arrows until the temperature adjustment value you want is showing: -10.0F to 10.0F
  5. Press and release the S/Set key.
  6. Wait about three seconds. The display should go back to showing the current temperature.

Operating Limits

You can adjust the temperature range in which the controller will operate. By default the range is -58F to 194F. With these settings, if the temperature drops below -58F, the display will blink "LLL" and will not provide power. If the temperature rises above 194F, the display will blink "HHH" and will not provide power.

To adjust the upper limit:
  1. Hold the S or Set key for about three seconds until the display shows HC. Release the key. 
  2. Press the up or down arrow until the display shows HA.
  3. Press and release the S/Set key. The current upper limit value will blink (the default is 194F).
  4. Use the up or down arrows until the upper limit value you want is showing.
  5. Press and release the S/Set key.
  6. Wait about three seconds. The display should go back to showing the current temperature.
To adjust the lower limit:
  1. Hold the S or Set key for about three seconds until the display shows HC. Release the key. 
  2. Press the up or down arrow until the display shows LA.
  3. Press and release the S/Set key. The current lower limit value will blink (the default is -58F).
  4. Use the up or down arrows until the lower limit value you want is showing.
  5. Press and release the S/Set key.
  6. Wait about three seconds. The display should go back to showing the current temperature.

Other models that these instructions might work for

Based on the pictures, these controllers seem to be almost exactly the same product.

Wednesday, April 1, 2015

What do good data models look like?

So you have a new database to look at, and you want a quick take on what you are in for.

Assuming that the database is meant for online transaction processing (OLTP), here's a very rough way to look at it.

Baaaaad Data Model

The picture below represents, in my mind, the prototypical low-quality data model. It has only a few tables, but each table is "wide" - it has a lot of fields in it. There are also only a few ways that the tables are clearly related. In short, the bad data model:
  • has few tables 
  • the tables have lots of columns in them
  • the tables are not tightly related

Baaaad Data Model

Goooood Data Model

So what does a good data model look like? Lots of tables, not very many columns per table, with lots of relationships. In the picture below, the "not very many columns" is represented by the narrow rectangles.

In short, a high-quality data model has:

  • lots of tables
  • few columns per table
  • lots of relationships 

Gooood Data Model
Why?

The OLTP  use case has a few common characteristics:

  • it supports multiple systems and many users concurrently
  • it doesn't know when work will arrive - episodic traffic rather than periodic
  • it doesn't know what work will arrive - traffic is made up of all operations: SELECT, INSERT, UPDATE, DELETE
  • data quality is of high importance

Relational database management systems were created to directly address the OLTP use case, and they do it well.

The characteristics above imply the characteristics that a high-quality data model should have:

  • it should be clear and descriptive of the data
  • it should enforce data quality
  • it should be flexible

Clear and Descriptive

A high-quality data model should be a "picture that is worth a thousand words". You should be able to look at the data model, and figure out what the organization does. You should be able to see every person, place, thing, idea, event, and transaction that is important to the organization. The names of tables should be consistent with the language of the organization. If the organization refers to a "agreement", the table representing it should not be called "contract", "lease",  "arrangement", "accord", "pact", etc.

High-quality data models have a table for each entity (lots of tables). So each entity is identified separately and given a name. Low-quality data models have multiple entities stored in a single table (few tables). So multiple entities are combined into a single table, and hidden. They have no name, and are undocumented.

Data Quality

A high-quality data model should help to enforce that data is reasonable as it is enters the database. In a high-quality data model, each relationship represents a referential integrity CHECK constraint. This is one way that data is checked for reasonableness as it enters the database. So, a data model that has lots of relationships is checking for reasonableness in many places, and making sure "stupid errors" don't occur. 

A high-quality data model that is clear and descriptive also clarifies what accurate data should look like. A single-entity table clarifies what a reasonable record should look like. It makes it easy to define other CHECK constraints. 

A low-quality data model with few relationships has not captured all the different referential integrity CHECK constraints that could be used to maintain data quality. Furthermore, a large table that represents multiple entities makes it difficult to know what a reasonable record should look like. 

Flexibility

This is probably the most subtle, and hardest to grok without experience. 

A high-quality data model should be flexible. It should work well with all current and future systems. It should accept new features without excessive effort. It should accept bug fixes and modifications elegantly. It should not be difficult to work with from one perspective, but easy from another. In short, it should not suffer from program-data dependence. 

High-quality data models store the data in a form uninfluenced by any particular systems' usage of the data. Clear single-entity tables describe and store the data, rather than promote a particular usage of the data. Relationships describe how entities relate, regardless of systems' usage.

Low-quality data models typically impose a bias on usage of the data. When multiple entities are in a single table, the data is stored pre-JOINed in a certain manner. It is difficult to JOIN in other ways. It is also more difficult to separate one entity from an entity that it is pre-JOINed with.

Qualifications

Your mileage may vary according to your situation. Data models are not really good/bad. They have advantages and disadvantages, depending on situations.  

This is a high-level way to get a quick read on a database before digging into the details. I think it's also a good way to remain grounded in the objectives of clarity, data quality, and flexibility.


Tuesday, February 10, 2015

Fix for Zoomit.exe Error launching 64-bit version...

Had a small problem trying to get Zoomit running on a machine. It stopped working after some changes to our Group Policy in a response to a nasty virus that hit our network.

I use Zoomit frequently, and the Windows Magnifier is really not a satisfactory substitute.

Here's the error I was getting when I tried to install it:


Our tech support person found this post by Andrew Potts. It worked, but it lacked a few details that I had to work out. So I thought I would expand on it.

So it seems that running ZoomIt.exe attempts to write something into the Temp folder, which is blocked by the group policy. Apparently, this is only a problem on 64-bit machines.

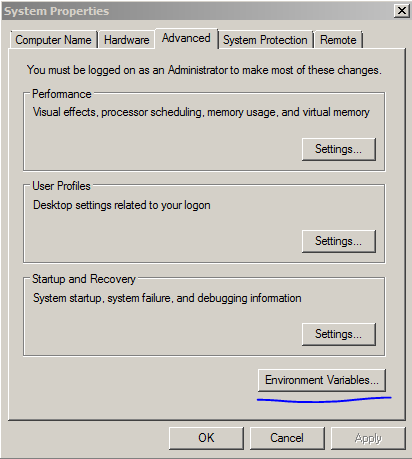
The Temp folder is defined as an environment variable, which you can change in the Control Panel under System:

Or, if you are comfortable at the command line, you can change this with the SET command:

SET TEMP=C:\temp1

So here's the exact steps that I used to fix this on my machine:

  1. get to a command prompt by running cmd under Start|Run
  2. run the command "SET" to see the current environment variables including TEMP (no command arguments, just the command SET)
  3. record the current TEMP variable value - you'll probably want to set this back to the original when you are done
  4. create a folder C:\temp1
  5. copy the ZoomIt.exe to the C:\temp1 folder
  6. run the command "SET TEMP=C:\temp1" - sets the TEMP variable to the new folder
  7. run the command "cd C:\temp1" - changes the working directory to the new folder
  8. run the command "ZoomIt.exe" - runs the installer
  9. you should now see a file "C:\temp1\ZoomIt64.exe" 
  10. run the "SET TEMP=..." command to set the TEMP variable back to its original value
You can copy this file wherever you want, or simply leave it where it is and create a shortcut to it.


Wednesday, February 4, 2015

One Way to Think About SQL Joins: It's just a WHERE Clause

When I teach relational database, I have several ways that I present the concept of joins.

One way to think about a join is that it is simply a WHERE clause.

Take the following data model from the MS Northwinds reference database. 


I've modified the data so that we can focus on a limited number of records, and see what's going on more clearly.

    SELECT  SupplierID,
            CompanyName
    FROM    Suppliers

gives:

    SupplierID  CompanyName
    ----------- ----------------------------------------
    3           Grandma Kelly's Homestead

    9           PB Knäckebröd AB
and

    SELECT  ProductID,
            SupplierID,
            ProductName
    FROM    Products

gives:

    ProductID   SupplierID  ProductName

    ----------- ----------- --------------------------------
    7           3           Grandma's Boysenberry Spread
    8           3           Uncle Bob's Organic Dried Pears
    9           3           Northwoods Cranberry Sauce
    23          9           Gustaf's Knäckebröd
    24          9           Tunnbröd

Given those tables and data, consider this statement:

SELECT   Suppliers.SupplierID,
         Suppliers.CompanyName,
         Products.ProductID,
         Products.SupplierID,
         Products.ProductName
FROM     Suppliers,
         Products
ORDER BY Suppliers.SupplierID,
         Products.ProductID   

Notice that there is no explicit JOIN statement. (So this is a CROSS JOIN) This SELECT statement returns:

SupplierID  CompanyName                 ProductID   SupplierID  ProductName
----------- --------------------------- ----------- ----------- -------------------------------
3           Grandma Kelly's Homestead   7           3           Grandma's Boysenberry Spread
3           Grandma Kelly's Homestead   8           3           Uncle Bob's Organic Dried Pears
3           Grandma Kelly's Homestead   9           3           Northwoods Cranberry Sauce
3           Grandma Kelly's Homestead   23          9           Gustaf's Knäckebröd
3           Grandma Kelly's Homestead   24          9           Tunnbröd
9           PB Knäckebröd AB            7           3           Grandma's Boysenberry Spread
9           PB Knäckebröd AB            8           3           Uncle Bob's Organic Dried Pears
9           PB Knäckebröd AB            9           3           Northwoods Cranberry Sauce
9           PB Knäckebröd AB            23          9           Gustaf's Knäckebröd
9           PB Knäckebröd AB            24          9           Tunnbröd

A CROSS JOIN gives all possible combinations of the records in Suppliers and the records in Products. Think of the database engine as saying "You haven't specified how to match up the records, so I'm assuming any record can match with any other record."

But clearly, there in the resulting combinations, some suppliers are shown next to products that they do not supply, i.e., the supplierID from the supplier record does not match the supplierID from the product record (highlighted in red below):

SupplierID  CompanyName                 ProductID   SupplierID  ProductName
----------- --------------------------- ----------- ----------- -------------------------------
3           Grandma Kelly's Homestead   7           3           Grandma's Boysenberry Spread
3           Grandma Kelly's Homestead   8           3           Uncle Bob's Organic Dried Pears
3           Grandma Kelly's Homestead   9           3           Northwoods Cranberry Sauce
3           Grandma Kelly's Homestead   23          9           Gustaf's Knäckebröd
3           Grandma Kelly's Homestead   24          9           Tunnbröd
9           PB Knäckebröd AB            7           3           Grandma's Boysenberry Spread
9           PB Knäckebröd AB            8           3           Uncle Bob's Organic Dried Pears
9           PB Knäckebröd AB            9           3           Northwoods Cranberry Sauce
9           PB Knäckebröd AB            23          9           Gustaf's Knäckebröd
9           PB Knäckebröd AB            24          9           Tunnbröd

But some suppliers are shown next to products that they do supplier, i.e., the supplied ID from the supplier record does match the supplierID from the product record (highlighted in green below):

SupplierID  CompanyName                 ProductID   SupplierID  ProductName
----------- --------------------------- ----------- ----------- -------------------------------
3           Grandma Kelly's Homestead   7           3           Grandma's Boysenberry Spread
3           Grandma Kelly's Homestead   8           3           Uncle Bob's Organic Dried Pears
3           Grandma Kelly's Homestead   9           3           Northwoods Cranberry Sauce
3           Grandma Kelly's Homestead   23          9           Gustaf's Knäckebröd
3           Grandma Kelly's Homestead   24          9           Tunnbröd
9           PB Knäckebröd AB            7           3           Grandma's Boysenberry Spread
9           PB Knäckebröd AB            8           3           Uncle Bob's Organic Dried Pears
9           PB Knäckebröd AB            9           3           Northwoods Cranberry Sauce
9           PB Knäckebröd AB            23          9           Gustaf's Knäckebröd
9           PB Knäckebröd AB            24          9           Tunnbröd

So, if we were to add a condition in the WHERE clause that enforced that only the records in green above should be shown:

SELECT   Suppliers.SupplierID,
         Suppliers.CompanyName,
         Products.ProductID,
         Products.SupplierID,
         Products.ProductName
FROM     Suppliers,
         Products
WHERE    Suppliers.SupplierID = Products.SupplierID
ORDER BY Suppliers.SupplierID,
         Products.ProductID 

Then we would get the suppliers matched up with the correct products:

SupplierID  CompanyName                 ProductID   SupplierID  ProductName
----------- --------------------------- ----------- ----------- -------------------------------
3           Grandma Kelly's Homestead   7           3           Grandma's Boysenberry Spread
3           Grandma Kelly's Homestead   8           3           Uncle Bob's Organic Dried Pears
3           Grandma Kelly's Homestead   9           3           Northwoods Cranberry Sauce
9           PB Knäckebröd AB            23          9           Gustaf's Knäckebröd
9           PB Knäckebröd AB            24          9           Tunnbröd


Followers