Thursday, October 8, 2015

What's slow on my database server?

What's slow on my database server?

A video investigating the relative performance of network, disk IO, and CPU on SQL Server.


Here is the SQL that goes with the demo.

-- Database by Doug
-- 10/8/2015
-- What's Slow Demo?

-- for database performance
-- There are 3 basic items to worry about:
-- * IO
-- * Network
-- * CPU

-- I see many people focus on them in this order:
-- 1 - CPU
-- 2 - IO
-- 3 - network

-- this demo should show that you should focus on them in this order:
-- 1 - network
-- 2 - IO
-- 3 - CPU


-- part 1: network vs IO
use referencedb

SET STATISTICS IO ON

SELECT *
FROM   Person

-- about 53 seconds

-- while this runs, here's some basics about the setup:

-- SQL Instance running as a virtual machine, no idea about the storage, general purpose
-- synthetic data with reasonable data distributions
-- 1.3M records
-- average record size is about 456 bytes
-- zero fragmentation
-- total table size about 587MB
-- some bogus fields for experimentation
-- no non-clustered indexes

--CREATE TABLE [dbo].[Person](
-- [ID] [int] IDENTITY(1,1) NOT NULL,
-- [salutory] [nvarchar](15) NULL,
-- [firstName] [nvarchar](25) NULL,
-- [middleInitial] [nchar](1) NULL,
-- [lastName] [nvarchar](25) NOT NULL,
-- [nameSuffix] [nvarchar](8) NULL,
-- [email] [nvarchar](255) NULL,
-- [entryDate] [datetime] NOT NULL CONSTRAINT [DF_Person_entryDate]  DEFAULT (getdate()),
-- [lastUpdateDate] [datetime] NOT NULL CONSTRAINT [DF_Person_lastUpdateDate]  DEFAULT (getdate()),
-- [weight] [float] NULL,
-- [gender] [char](1) NULL,
-- [dateOfBirth] [date] NULL,
-- [bogusGUID] [uniqueidentifier] ROWGUIDCOL  NULL CONSTRAINT [DF_Person_bogusGUID]  DEFAULT (newid()),
-- [bogusGUID2] [uniqueidentifier] NULL CONSTRAINT [DF_Person_bogusGUID2]  DEFAULT (newid()),
-- [bogusChar] [char](100) NOT NULL CONSTRAINT [DF_Person_bogusChar]  DEFAULT ('fred'),
-- [bogusNChar] [nchar](100) NOT NULL CONSTRAINT [DF_Person_bogusNChar]  DEFAULT (N'george'),
-- CONSTRAINT [PK_Person] PRIMARY KEY CLUSTERED ( [ID] ASC)
--) ON [PRIMARY]


-- ok, so what about this?
SELECT TOP 1 ID
FROM   Person

-- one record, one value, 4 bytes
-- 0 seconds - the time for a round trip

-- so what is slow?

SELECT ID
FROM   Person
-- 1.3M records, 4 bytes each
-- about 4 seconds

SELECT ID, ID
FROM   Person
-- 1.3M records, 8 bytes each
-- about 5 seconds

SELECT bogusGuid
FROM   Person
-- 1.3M records, 16 bytes each
-- about 5 seconds


SELECT bogusGUID,
       bogusGUID2
FROM   Person
-- 1.3M records, 32 bytes each
-- about 6 seconds

SELECT 75804 * 8/1024

SELECT bogusGUID,
       bogusGUID2,
       '1234567890'
FROM   Person
-- 1.3M records, 42 bytes each
-- about  seconds

SELECT bogusGUID,
       bogusGUID2,
       '1234567890123456789012345678901234567890123456789012345678901234567890123456789012345678901234567890'
FROM   Person
-- 1.3M records, 132 bytes each
-- about 16 seconds

SELECT bogusGUID,
       bogusGUID2,
       '1234567890123456789012345678901234567890123456789012345678901234567890123456789012345678901234567890',
       '1234567890123456789012345678901234567890123456789012345678901234567890123456789012345678901234567890'
FROM   Person
-- 1.3M records, 232 bytes each
-- about 27 seconds


-- keep going, and you get a graph that looks like ...

-- but you are cheating - you have all your data in memory...

-- now starve the db server for memory
  /**
sp_configure 'show advanced options', 1;
GO
RECONFIGURE;
GO
sp_configure 'max server memory', 256;
GO
RECONFIGURE;
GO
**/
SELECT ID
FROM   Person
-- 1.3M records, 4 bytes each
-- about 4 seconds


-- network is slower than IO
-- even with  physical IO

-- **************************************************


 /**
sp_configure 'show advanced options', 1;
GO
RECONFIGURE;
GO
sp_configure 'max server memory', 2147483647;
GO
RECONFIGURE;
GO
**/

-- part 2: IO vs CPU


SELECT AVG(weight)
FROM   Person
-- 1.3M records, but only 8 bytes back
-- about 0 seconds

-- can we make it worse?
-- can we make the CPU worse?

SELECT weight
FROM   Person
-- 1.3M records, 8 bytes back per record
-- 4 seconds

SELECT MAX(weight)
FROM   Person
-- about 0 seconds

SELECT AVG(LOG(weight/1.7))
FROM     Person
-- 1.3M records, 8 bytes back
-- about 0 seconds

SELECT AVG(SQRT(LOG(weight/1.7)))
FROM     Person
-- about 0 seconds

SELECT AVG(SIN(SQRT(LOG(weight/1.7))))
FROM     Person
-- about 0 seconds

SELECT AVG(SIN(SQRT(10+3.3*LOG(weight/1.7))))
FROM     Person
-- about 1 seconds

SELECT AVG(SIN(SQRT(10+3.3*LOG(weight/1.7)))*PI())
FROM   Person
-- about 1 seconds

-- taking just the average out
SELECT (SIN(SQRT(10+3.3*LOG(weight/1.7)))*PI())
FROM   Person
-- 4 seconds

-- you can do tons of calculations, and not impact speed

-- summary: focus on items in this order
-- 1 - network
-- 2 - IO
-- 3 - CPU

-- caveats:
-- your mileage may vary
-- use your own judgement
-- this is the order in which I do investigations on a new database

-- end of what's slow

Thursday, October 1, 2015

Introduction to JOINs

A short video covering the JOINs within a SQL SELECT statement.

For beginners. How to show columns from more than one table in a single SELECT statement. Covers joining with the WHERE clause and the JOIN statement, and some best practices.


Here is the SQL that goes with the demo.

-- Database by Doug
-- Douglas Kline
-- 10/1/2015
-- Introduction to JOINs

USE Northwind

-- suppose we want to look at our products
-- and what categories they are in

SELECT   *
FROM     Products

-- focus more on just a few columns

SELECT   ProductID,
         ProductName,
         CategoryID
FROM     Products
ORDER BY ProductID

-- so what category is CategoryID 1? 4?

SELECT   *
FROM     Categories

-- focus in on the categoryName

SELECT   CategoryID,
         CategoryName
FROM     Categories

-- great, categoryID=1 is 'Beverages'
-- categoryID=4 is 'Dairy Products'

-- we used the CategoryID field in the Products table
-- to "look up" the name of the Category

-- but we don't want to do that for lots of records

SELECT   ProductID,
         ProductName,
         CategoryID
FROM     Products
ORDER BY ProductID

-- why not just add the CategoryName field to the SELECT clause?

SELECT   ProductID,
         ProductName,
         CategoryID,
         CategoryName
FROM     Products
ORDER BY ProductID

-- CategoryName is not a field in the Products table

-- OK, let's add the Categories table to the FROM statement

SELECT   ProductID,
         ProductName,
         CategoryID,
         CategoryName
FROM     Products,
         Categories
ORDER BY ProductID

-- that got rid of the syntax error on CategoryName
-- but now CategoryID is ambiguous??

-- look at the columns list for each table
-- there's a CategoryID in both the Products table 
-- and the Products table

-- so, we need to be more specific - which one do we mean

-- here's how

SELECT   ProductID,
         ProductName,
         Products.CategoryID,
         CategoryName
FROM     Products,
         Categories
ORDER BY ProductID

-- great, now we don't have any syntax errors

-- but we have 702 rows?
-- where is that coming from?

SELECT COUNT(CategoryID) AS [CategoryCount]
FROM   Categories

-- 9 categories

SELECT COUNT(ProductID) AS [ProductCount]
FROM   Products

-- 78 products

SELECT 9 * 78

-- 702 - just like the number of records

SELECT   ProductID,
         ProductName,
         Products.CategoryID,
         CategoryName
FROM     Products,
         Categories
ORDER BY ProductID

-- let's look closer
-- adding the categoryID from the Categories table

SELECT   ProductID,
         ProductName,
         Products.CategoryID,
         Categories.CategoryID,
         CategoryName
FROM     Products,
         Categories
ORDER BY ProductID

-- that's odd, why is chai being shown next to the wrong category?
-- in fact, it's being shown next to *every* category

-- all products are shown next to every category

-- because we haven't stated how the products and categories should be related
-- the database engine returns all possible combinations of products and categories
-- this is called a CROSS JOIN
-- this is sometime what we want, but not usually

-- so , how do we limit the returned records below 
-- so that only the ones with matching categoryIDs are kept?

-- using the WHERE clause
--

SELECT   ProductID,
         ProductName,
         Products.CategoryID,
         Categories.CategoryID,
         CategoryName
FROM     Products,
         Categories
WHERE    Products.CategoryID = Categories.CategoryID -- ******** 
ORDER BY ProductID

-- this looks a lot better
-- chai has a categoryID = 1, and it is shown next to the category with categoryID = 1

-- but the record count is 77?
-- aren't there 78 products?

-- looking at the products again...

SELECT   ProductID,
         ProductName,
         CategoryID
FROM     Products
ORDER BY ProductID

-- scrolling down, we can see that Dougs Mustard has a NULL categoryID
-- and looking back our combined query

SELECT   ProductID,
         ProductName,
         Products.CategoryID,
         Categories.CategoryID,
         CategoryName
FROM     Products,
         Categories
WHERE    Products.CategoryID = Categories.CategoryID -- ******** 
ORDER BY ProductID

-- scrolling down, note that Dougs Mustard doesn't appear
-- because this Products.CategoryID = Categories.CategoryID
-- is essentially this: NULL = Categories.CategoryID
-- which is false (NULLs in another video)

-- ok, looks like we have the logic right with this:
SELECT   ProductID,
         ProductName,
         Products.CategoryID,
         Categories.CategoryID,
         CategoryName
FROM     Products,
         Categories
WHERE    Products.CategoryID = Categories.CategoryID 
ORDER BY ProductID

-- but humans don't really want to see the CAtegoryID 
-- so we can remove them

SELECT   ProductID,
         ProductName,
         CategoryName
FROM     Products,
         Categories
WHERE    Products.CategoryID = Categories.CategoryID 
ORDER BY ProductID

-- the above is called a JOIN of the Products and Categories table
-- the above is stated as a constraint in the WHERE clause
-- but it is a special kind of a constraint
-- between the Primary Key of one table, and the Foreign Key in another table

-- so one way to look at a JOIN is as a constraint
-- you make all possible combinations of the records from two tables
-- then remove the ones that don't have equal PK--FK combinations

-- another way to view a JOIN is as a specific combination of tables
-- combine the tables in a specific way to create a specific set of records
-- then show fields from the combined set of records

-- this is done in the FROM clause

SELECT   ProductID,
         ProductName,
         CategoryName
FROM     Products JOIN Categories ON Products.CategoryID = Categories.CategoryID 
ORDER BY ProductID

-- this is logically equivalent
-- it will always return the same records as the WHERE clause version

-- I like to format it like this:

SELECT   ProductID,
         ProductName,
         CategoryName
FROM     Products 
   JOIN  Categories     ON Products.CategoryID = Categories.CategoryID 
ORDER BY ProductID

-- I suggest you learn both ways
-- so you can read either way when you encounter it
-- also, sometimes one way is clearer than another in a certain context

-- the JOIN syntax signals your *intention* better than the WHERE clause
-- and generally organizes your statement better 

-- conceptually, it is an binary operator between two tables, 
-- with an ON clause to specify details that the operator will use
-- it is *not* a list of tables (separated by commas),
-- but an expression that states how to combine the tables

-- one last thing
-- safe SQL coding practice
-- right now the statement below works fine
-- it is syntactically correct

SELECT   ProductID,
         ProductName,
         CategoryName
FROM     Products 
   JOIN  Categories     ON Products.CategoryID = Categories.CategoryID 
ORDER BY ProductID

-- but what would happen if in the future
-- someone put a CategoryName field in the Products table?
-- then there would be a CategoryName field in both Products and Categories

-- they *should* be able to do that without breaking code
-- even if it doesn't make sense

-- then categoryName would become ambiguous and the code would not execute

-- so how do we prevent that possible future bug?

-- by *qualifying* every field like this

SELECT   Products.ProductID,
         Products.ProductName,
         Categories.CategoryName
FROM     Products 
   JOIN  Categories     ON Products.CategoryID = Categories.CategoryID 
ORDER BY Products.ProductID

-- safe coding rule:
-- whenever there is more than one table 
-- fully qualify every field in every clause: SELECT, FROM, WHERE, ORDER BY, etc.


-- intro to JOIN...

Wednesday, September 16, 2015

The SQL ORDER BY clause

A short video covering the ORDER BY clause within a SQL SELECT statement.

For beginners. How to use the ORDER BY clause in the SELECT statement. Covers multiple sort keys, ascending, descending, how NULLs are handled, and best practice.


Here is the SQL that goes with the demo.

-- Database by Doug
-- Douglas Kline
-- 9/16/2015
-- all about ORDER BY

USE Northwind

-- refresher

-- the result of a SELECT statement is a table
-- it has columns and rows, defined by the SELECT statement


SELECT ProductName,
       ProductID, 
       supplierID
FROM   Products
WHERE  unitprice > 10

-- the SELECT statement above creates a two-column, many-row table

-- the SELECT *clause* defines the which columns are in the resulting table, and their order

-- the WHERE clause defines which rows are in the resulting table

-- refresher over...

-- but what about the the *order* of the rows?

-- is there a default ordering?

SELECT ProductName
FROM   Products

SELECT ProductName,
       ProductID
FROM   Products

-- looking at the results, it seems like they are ordered by productID
 -- let's try the above in different orders of operation?

 -- changes in ordering of the rows, even though the actual records included do not change

 -- in short, the database engine will return the records in the most convenient order (for itself)
 -- it will NOT spend any extra time ordering rows for YOUR convenience, unless you ask

 -- so here's how you do it - the ORDER BY clause

 SELECT   ProductName
 FROM     Products
 WHERE    unitprice > 10
 ORDER BY ProductName ASC

  -- the ORDER BY clause always appears at the end of the SELECT statement

 -- the query above orders by the productname in ascending order

 -- the ordering is alphabetical, because ProductName is not numeric - it is character-based

 SELECT   ProductName
 FROM     Products
 WHERE    unitprice > 10
 ORDER BY ProductName DESC

 -- orders descending

-- in these examples, productName is the sort key, used to order either ascending or descending

-- by default, the ordering of a sort key is ascending
 
 SELECT   ProductName
 FROM     Products
 WHERE    unitprice > 10
 ORDER BY ProductName 

 -- so the above and the below are equivalent

 SELECT   ProductName
 FROM     Products
 WHERE    unitprice > 10
 ORDER BY ProductName ASC


 -- another example, with numeric data

SELECT   ProductName,
         unitprice
FROM     Products
ORDER BY unitprice DESC

-- " show the products with the most expensive at the top"

-- notice that the sort key does not need to be the first column

-- furthermore, the sort key need not be in any other clause of the SELECT statement


SELECT   ProductName,
         unitprice
FROM     Products
WHERE    reorderlevel > 10
ORDER BY productID ASC

-- note that each clause (SELECT, WHERE, ORDER BY) has different fields in it

-- However, the above query can be diconcerting to users
-- it is more common to have the sort keys in the SELECT clause, and in the same order as in the SELECT clause

-- like this
SELECT   ProductID,
         ProductName,
         unitprice
FROM     Products
WHERE    reorderlevel > 10
ORDER BY productID ASC

-- now the ordering is clear to the user

-- it is also possible to use multiple sort keys

SELECT   SupplierID,
         ProductID,
         ProductName,
         unitprice
FROM     Products
ORDER BY SupplierID ASC,
         ProductID  ASC

-- this means...
-- sort first by the SupplierID, ascending
-- then, when multiple records have the same SupplierID, sort by ProductID, ascending

-- note also how NULLs are handled for numerics
-- NULLs are considered to be smaller than numeric values
SELECT   SupplierID,
         ProductID,
         ProductName,
         unitprice
FROM     Products
ORDER BY SupplierID DESC,
         ProductID  ASC

-- how about characters?

SELECT   QuantityPerUnit,
         ProductName
FROM     Products
ORDER BY QuantityPerUnit

-- again, NULLs are considered to be smaller than characters

-- for SQL embedded in systems, you should always include an order by
-- consumers of the SELECT results may assume an ordering and actually *depend* on it
-- furthermore, it is best to have a *unique* ordering
-- again, downstream systems may assume and *depend* on a unique ordering

-- a non-unique ordering:

SELECT    ProductName
FROM      Products
ORDER BY  ProductName

-- improvement to make the ordering unique:

SELECT    ProductName
FROM      Products
ORDER BY  ProductName,
          ProductID

-- all about ORDER BY, the end :-)

Thursday, September 3, 2015

Simple WHERE clauses

A short video covering simple WHERE clauses within a SQL SELECT statement.


For beginners. Covers the comparison operators, and logical expressions using NOT, AND, and OR.


Here is the SQL that goes with the demo.

Use Northwind

SELECT 'FRED' AS [firstName],
       23     AS [age]

-- SELECT statements always returns a table

-- the SELECT clause determines the columns of the table

SELECT *
FROM   Products

-- so the * 'wildcard' means 'all columns'
-- the above statement says 'create a table with a column for every column in the Products table'

SELECT   ProductID
FROM     Products

-- in this next statement, I am re-ordering the columns
SELECT   ProductName,
         ProductID, 
         unitprice
FROM     Products

-- we are seeing all rows from the products table
-- note the ordering of the rows

-- to specify the order of the rows, we need a new clause: ORDER BY
SELECT   Productname,
         ProductID,
         unitprice
FROM     Products
ORDER BY ProductID ASC

-- or
SELECT   Productname,
         ProductID,
         Unitprice
FROM     Products
ORDER BY UnitPrice DESC


-- 

-- at this point, we can control:
--  which columns with the SELECT clause
--  the *order* of the columns with the SELECT clause
--  the source of the data with the FROM clause
--  the *order* of the rows

-- but we haven't yet specified *which* rows
-- we need the WHERE clause for that

SELECT   Productname,
         ProductID,
         Unitprice
FROM     Products
WHERE    unitprice < 8
ORDER BY UnitPrice DESC

-- so here's the general form of the SELECT statement so far:

--SELECT   
--FROM     
--WHERE    
--ORDER BY 

-- SELECT and ORDER BY take lists of expressions
-- whereas FROM and WHERE take expressions

-- here's what I mean
SELECT   LEFT(ProductName, 3),
         unitprice * 2.2
FROM     Products
ORDER BY ProductName,
         SQRT(unitprice) DESC

-- see how the items in SELECT and ORDER BY are lists - they have commas
-- and they can be *expressions*

SELECT   Productname,
         ProductID,
         Unitprice
FROM     Products
WHERE    unitprice < 8
ORDER BY UnitPrice DESC

-- this part is an expression: unitprice < 8
-- furthermore, it's a *logical* expression
-- it is either true or false (zero or one)

SELECT   unitprice,
         CONVERT(bit, CASE WHEN unitprice < 8 then 1 else 0 end) AS [cheap product]
FROM     Products
ORDER BY unitprice asc

-- don't pay attention to the CONVERT... expression
-- but notice, I can *test* whether or not a unitprice is less than 8

-- now the same thing, but only show the cheap products
SELECT   unitprice,
         CONVERT(bit, CASE WHEN unitprice < 8 then 1 else 0 end) AS [cheap product]
FROM     Products
WHERE    unitprice < 8
ORDER BY unitprice asc

-- what about other ways?

SELECT   ProductID,
         unitprice,
         ProductName,
         discontinued
FROM     Products
WHERE    unitprice >= 10
ORDER BY ProductID

-- comparison operators: >, >=, <, <=, =
-- and 'not equal to' can be <>  or !=

SELECT   ProductID,
         unitprice,
         ProductName,
         discontinued
FROM     Products
WHERE    ProductName = 'Chai'
ORDER BY ProductID

SELECT   ProductID,
         unitprice,
         ProductName,
         discontinued
FROM     Products
WHERE    ProductName > 'Chai'
ORDER BY ProductID

SELECT   ProductID,
         unitprice,
         ProductName,
         discontinued
FROM     Products
WHERE    ProductName <> 'Chai'
ORDER BY ProductID

SELECT   ProductID,
         unitprice,
         ProductName,
         discontinued
FROM     Products
WHERE    discontinued = 1
ORDER BY ProductID

-- with an embedded expression

SELECT   ProductID,
         unitprice,
         ProductName,
         discontinued
FROM     Products
WHERE    (Unitprice)/2.0 > 5
ORDER BY ProductID

-- (Unitprice)/2.0 is a mathematical expression that evaluates as a number
-- (Unitprice)/2.0 > 5 is a logical expression that evaluates as 'true' or 'false'

-- now for some logical operators: NOT, AND, OR
SELECT   ProductID,
         unitprice,
         ProductName,
         discontinued
FROM     Products
WHERE    discontinued = 1
ORDER BY ProductID

SELECT   ProductID,
         unitprice,
         ProductName,
         discontinued
FROM     Products
WHERE    NOT (discontinued = 1)
ORDER BY ProductID

-- combine two logical expression with AND
-- makes a bigger logical expression

SELECT   ProductID,
         unitprice,
         ProductName,
         discontinued
FROM     Products
WHERE    discontinued = 0
   AND   unitprice > 5
ORDER BY ProductID

SELECT   ProductID,
         unitprice,
         ProductName,
         discontinued
FROM     Products
WHERE    discontinued = 0
   OR    unitprice > 5
ORDER BY ProductID

-- and you can control the order of evaluation with parentheses
SELECT   ProductID,
         unitprice,
         ProductName,
         discontinued
FROM     Products
WHERE    NOT discontinued = 0 AND unitprice > 5
ORDER BY ProductID

-- which is the same as
SELECT   ProductID,
         unitprice,
         ProductName,
         discontinued
FROM     Products
WHERE    (NOT discontinued = 0) AND unitprice > 5
ORDER BY ProductID


-- which is different than 
SELECT   ProductID,
         unitprice,
         ProductName,
         discontinued
FROM     Products
WHERE    NOT (discontinued = 0 AND unitprice > 5)
ORDER BY ProductID


-- that's simple WHERE clauses


Wednesday, August 26, 2015

No-Table SELECT statements

A short video covering simple SELECT statements.


Very simple SQL SELECT statements without a table. No FROM clause!

For beginners. Covers renaming a column, selecting number and string literals, simple math expressions, string concatenation, and column ordering.


Here is the SQL that goes with the demo.

USE Northwind

-- basic no-table SQL statements

SELECT 54

-- look at the results
-- notice that this is a one-row, one-column table, with no name for the column

SELECT 'Hello'

-- similar to above, but with text characters
-- note that numbers are shown in black (if you are viewing in SQL Mgmt Studio)

SELECT '54' 

-- similar to first, but different, in that the result is NOT a number
-- note that character strings are shown in red

SELECT 54 AS [A Number]

-- here, we are assigning a name to the column
-- this is important, so that we can refer to the column if we want
-- note that "reserved words", are shown in blue

SELECT 2 + 2

-- here is a mathematical expression that is evaluated by the SQL engine on the remote server

SELECT 2 + 2 AS [The Number 4]


SELECT 2 * (17/3) AS [mathematical expression result]
SELECT 2.0 * (17.0/3.0) AS [mathematical expression result]

-- the math operators are similar to those in a spreadsheet
-- note that you can use parentheses to control the order of operations

SELECT 'Bar' + 'ney' AS [The name Barney]

-- here, we are using a character string expression
-- concatenating two character strings into a single character string

SELECT 'Barney' + ' ' + 'Rubble'  AS [A Flintstones character]

-- three strings concatenated to produce first and last names with a space between

SELECT  SQRT(34) AS [Square Root of 34]

-- you can use functions in an expression
-- the SQRT function calculates the square root of the number
-- functions show up as pink/magenta
-- functions have a name, then parentheses

SELECT   SQRT(34)                   AS [Square Root of 34],
         'Barney' + ' ' + 'Rubble'  AS [A Flintstones character]

-- you can generate more than one column in the table that is created by the SELECT
-- there's two columns defined here, with a comma between them

SELECT   SQRT(34)                   AS [Square Root of 34],
         'Barney' + ' ' + 'Rubble'  AS [A Flintstones character],
         2 * (17/3)                 AS [mathematical expression result]

-- here are three columns
-- note the comma at the end of each line

-- note also the formatting / spacing
-- you CAN write the above like this:

SELECT   SQRT(34) AS [Square Root of 34], 'Barney' + ' ' + 'Rubble'  AS [A Flintstones character], 2 * (17/3)  AS [mathematical expression result]

-- but it's harder to read

-- this is better

SELECT   SQRT(34) AS [Square Root of 34], 
'Barney' + ' ' + 'Rubble'  AS [A Flintstones character], 
2 * (17/3)  AS [mathematical expression result]

-- and even better

SELECT   SQRT(34) AS [Square Root of 34], 
         'Barney' + ' ' + 'Rubble'  AS [A Flintstones character], 
         2 * (17/3)  AS [mathematical expression result]

-- most readable is this

SELECT   SQRT(34)                   AS [Square Root of 34],
         'Barney' + ' ' + 'Rubble'  AS [A Flintstones character],
         2 * (17/3)                 AS [mathematical expression result]


Thursday, June 25, 2015

DIY Digital Temperature Controller for Homebrewers

DIY Digital Temperature Controller for Homebrewers

So someone gave you a freezer, and you want to turn it into a kegerator? Or a fermenter?

You have two basic options:
  1. buy something
  2. build something


The typical "buy" option is a Johnson Controls Digital Thermostat Control Unit . You put the sensor inside the freezer, plug the freezer into the controller, then plug the controller into an outlet. Quick and easy. You can get these from your local brewer supply shop, or online, about $80.

If you want to build something, you have, again, two basic options:
  1. replace the temperature controller
  2. build a separate device
I've done both. Replacing the temperature controller gives you a sleek look but is more time consuming, and takes marginally more expertise. I had to mess with spidery cobwebs, muck, and dirt. And, I didn't really like the placement of it, for adjustment purposes.

Fermenter with DIY Integrated Temperature Controller
Kegerator with DIY Integrated Temperature Controller

Closeup of Temperature Controller
The separate controller has some advantages:
Front of Controller
  • it's easier to build
  • You can easily move it from one freezer to another
  • You can place it wherever you want, or even move it around
  • You can pick it up and bring it up to eye level to set
  • You don't have to tear into your freezer


I built this for about $30, but you could do it cheaper if you scavenge some parts.The essential item is the temperature controller for $16. I bought everything from Amazon using Amazon Prime, and got everything in the mail two days later (Try Amazon Prime 30-Day Free Trial ).

Parts List

Docooler® Digital Temperature Controller


computer power socket


Power Outlet


A Project Box


I think you could use a cigar box instead of the project box, and it would look pretty cool. The sockets could be scavenged from whatever you have around. I decided to use a computer cord, but I could have easily taken an old power cord from some other appliance, or buy a power cord rather than a socket.

In addition to the above items, I used some spade-style connectors and wire that I already had. No soldering - everything was done with a crimper.

The same temperature controller seems to be available under a number of different brand names. I've used the docooler brand three times with no trouble. The instructions are not that clear, so I've written up what I think are better instructions.

Instructions

Prepare the box

Cut three holes in your project box to fit the thermostat, the power inlet, and the power outlet. In my case, these were all squarish holes that I cut by drilling pilot holes and using a coping saw. The project case was actually easy to cut with a utility knife, so I trimmed everything nicely with the utility knife. Drill another hole for the thermostat wire.


As you can see, I put the two power sockets on one end, and the controller and thermostat wire on the other end.


Make some wires with leads

In my case, I used the spade connectors. This was extremely neat and clean and easy. Based on the wiring diagram, I needed:
  • 2 pieces of wire about 6 inches long with a spade connector on one end, and a stripped portion on the other
  • 1 piece of wire about 4 inches long with a space connector on each end (yellow in the pictures - used as a ground wire)
  • 2 wiring parts that had two wires coming out of a single spade connector, and stripped wire on the other ends. See the picture below. See how there are two red wires coming out of a single crimped connector?
The spade connectors will attach to the power sockets, and the stripped ends will connect into the controller.


Put it together

Put the controller in the box. There are two sliding pieces that secure the controller into the opening. I took these sliding pieces off, put the controller in the box, then snapped the sliding pieces back on, and snugged them up. These are the orange pieces on the right side of the picture below.

The two power outlets were attached in different ways. The computer power socket (power IN from a wall outlet) used two screws. I used self-tapping metal screws, but some small wood screws would have looked better. 

The regular 110V power socket (power OUT to the freezer) snapped into place. This one was more critical to get the hole size correct, and trim some of the interior ridges for a good fit.

Connect the wires

So this is the part that's a little tougher to see in the pictures. Not difficult, but you have to get it right.

I describe the wiring below, and based on finished picture. In reality, I connected all the pies to the controller first, and replaced the wire guard. Then slide the controller into place and cinched it up with the orange sliding pieces. Then connected up the spade connectors.

In the picture below, the controller is at the top, the IN power connector is on the bottom left, and the OUT power connector is on the bottom right. The guillotine-style connectors on the controller are numbered from right to left, 1 through 6. Six is on the left. One is on the right. This is consistent with the wiring diagram that comes with the controller.


Starting with the IN power connector on the bottom left. The 2-blue-wire connector goes into controller connectors one and three. The 2-red-wire connector goes into controller connector four, and the right side of the OUT power connector. 

The yellow wire is the ground, and goes directly between the ground posts on the IN and OUT power connectors. 

Finally, there is one more wire from the OUT power connector left-post (light blue in the picture above). This goes into the controller connector number two.

Finish it up

Lastly, I gently pushed the wires into the box and screwed the lid onto the project box.

I used an old computer power cord to plug into the IN side, then plugged the freezer into the OUT side, and dropped the thermostat into the freezer.

Some people will wrap the end of the thermostat with a gel-pack or attach it directly to the fermenter or keg. This helps keep the controller from repeatedly turning off and on too quickly.

The instructions are not very good, so I've written up some instructions in another post.

My last enhancement was to put some peel-and-stick magnetic sheet on one side. I can now put the whole box on the top, side, front or back of the freezer and it will stay there! I generally keep it on the side with the digital readout facing me for easy reading and setting changes.

cheers!


Saturday, June 20, 2015

English Manual for DoCooler Temperature Controller H9745


So I got this temperature controller from Amazon to control the temperature of a freezer. I bought the Farenheit version for about $16.

It's a great little item that I've used a few times to replace freezer thermostats for a beer cooler or fermenter.


But the operating instructions that come with it are pretty bad. Obviously written by a non-English speaker.

The number on the display while it's operating is the current thermostat temperature. So in the picture above, the temperature sensor is at 88.6F.

This controller can be in two main modes:

  • Heat mode - the controller will supply power if the thermostat reads under the set temperature, i.e., you are trying to keep something warm by supplying power to a heating device.
  • Cool mode - the controller will supply power if the thermostat reads over the set temperature, i.e., you are trying to keep something cool by supplying power to a cooling device. 

Not shown on the picture above are two red dots on the far left of the digital display, one to the right of the word Heat, and one to the right of the word Cool.
  • If the Heat light is on it means that the controller is in Heat mode, and the controller is supplying power. (Hey, it's too cool, I'll turn the heat on for you.)
  • If the Cool light is on, it means that the controller is in Cool mode, and the controller is supplying power. (Hey, it's too hot. I'll turn the cool on for you.)
  • If neither the Heat or Cool light is on, the temperature controller is not supplying power. But with no lights, you can't see if it's in Heat mode or Cool mode. It's either in Heat mode and warm enough, or Cool mode and cool enough.

Basic Settings

These are the items to change to get up and running. The defaults for the other settings are generally ok.

Changing from Heat mode to Cool mode

  1. Hold the S or Set key for about three seconds until the display shows HC. Release the key. 
  2. Press and release the S/Set key. H or C should show on the display and blink.
  3. Use the up or down arrows until the mode you want is showing: H or C.
  4. Press and release the S/Set key.
  5. Wait about three seconds. The display should now be showing the current temperature.

Changing the set temperature


  1. Press and release the S/Set key.The display will blink the current set temperature.
  2. Press and release the up or down arrow keys to change the set temperature. If you hold the up or down arrow key for 3 seconds, it will begin to adjust up or down more quickly.
  3. When you are at the temperature you want, wait about three seconds. The display will stop blinking and go back to showing the current thermostat temperature.

Advanced Settings

You might want to change these things depending on your application.

Adjusting the Hysteresis

The pamphlet that comes with the controller calls this the "slewing range of temperature". You can read about hysteresis in control systems on Wikipedia.

This is basically the "slop" around the set temperature to keep the controller from switching on and off too rapidly. The slewing range is in degrees fahrenheit.

Example: Assume you want to keep something at 40F, and the slewing range is set to 2F (the default). Then the temperature controller will not turn on until the temperature rises to at least 42F (40F + 2F). It will turn on, powering the cooling device, until the temperature reads 40F, then turn off. The temperature will likely continue to drop, to, let's say 38F. Then the temperature will start to rise. When the temperature reaches 42F, the controller will turn on again.

To adjust:

  1. Hold the S or Set key for about three seconds until the display shows HC. Release the key. 
  2. Press the up or down arrow until the display shows CP.
  3. Press and release the S/Set key. The current slewing range value will blink (the default is 2, meaning 2F).
  4. Use the up or down arrows until the slewing range value you want is showing: 1-30.
  5. Press and release the S/Set key.
  6. Wait about three seconds. The display should now be showing the current temperature.

Adjusting the Time Delay

The pamphlet that comes with the controller calls this the "delayed start". 
This is similar to the hysteresis - it is used to keep the controller from switching on and off too rapidly. The Time delay is in minutes.

This is the number of minimum number of minutes between the controller turning off, then turning back on again.


To adjust:

  1. Hold the S or Set key for about three seconds until the display shows HC. Release the key. 
  2. Press the up or down arrow until the display shows PU.
  3. Press and release the S/Set key. The current time delay value will blink (the default is 2, meaning 2 minutes between turning off and turning on).
  4. Use the up or down arrows until the time delay value you want is showing: 0-10.
  5. Press and release the S/Set key.
  6. Wait about three seconds. The display should now be showing the current temperature.

Temperature Correction

If you think your thermostat is not correct, you can adjust the controller by plus or minus ten degrees fahrenheit.

To adjust:
  1. Hold the S or Set key for about three seconds until the display shows HC. Release the key. 
  2. Press the up or down arrow until the display shows CA.
  3. Press and release the S/Set key. The current temperature adjustment value will blink (the default is 0.0, meaning there is no adjustment).
  4. Use the up or down arrows until the temperature adjustment value you want is showing: -10.0F to 10.0F
  5. Press and release the S/Set key.
  6. Wait about three seconds. The display should go back to showing the current temperature.

Operating Limits

You can adjust the temperature range in which the controller will operate. By default the range is -58F to 194F. With these settings, if the temperature drops below -58F, the display will blink "LLL" and will not provide power. If the temperature rises above 194F, the display will blink "HHH" and will not provide power.

To adjust the upper limit:
  1. Hold the S or Set key for about three seconds until the display shows HC. Release the key. 
  2. Press the up or down arrow until the display shows HA.
  3. Press and release the S/Set key. The current upper limit value will blink (the default is 194F).
  4. Use the up or down arrows until the upper limit value you want is showing.
  5. Press and release the S/Set key.
  6. Wait about three seconds. The display should go back to showing the current temperature.
To adjust the lower limit:
  1. Hold the S or Set key for about three seconds until the display shows HC. Release the key. 
  2. Press the up or down arrow until the display shows LA.
  3. Press and release the S/Set key. The current lower limit value will blink (the default is -58F).
  4. Use the up or down arrows until the lower limit value you want is showing.
  5. Press and release the S/Set key.
  6. Wait about three seconds. The display should go back to showing the current temperature.

Other models that these instructions might work for

Based on the pictures, these controllers seem to be almost exactly the same product.

Wednesday, April 1, 2015

What do good data models look like?

So you have a new database to look at, and you want a quick take on what you are in for.

Assuming that the database is meant for online transaction processing (OLTP), here's a very rough way to look at it.

Baaaaad Data Model

The picture below represents, in my mind, the prototypical low-quality data model. It has only a few tables, but each table is "wide" - it has a lot of fields in it. There are also only a few ways that the tables are clearly related. In short, the bad data model:
  • has few tables 
  • the tables have lots of columns in them
  • the tables are not tightly related

Baaaad Data Model

Goooood Data Model

So what does a good data model look like? Lots of tables, not very many columns per table, with lots of relationships. In the picture below, the "not very many columns" is represented by the narrow rectangles.

In short, a high-quality data model has:

  • lots of tables
  • few columns per table
  • lots of relationships 

Gooood Data Model
Why?

The OLTP  use case has a few common characteristics:

  • it supports multiple systems and many users concurrently
  • it doesn't know when work will arrive - episodic traffic rather than periodic
  • it doesn't know what work will arrive - traffic is made up of all operations: SELECT, INSERT, UPDATE, DELETE
  • data quality is of high importance

Relational database management systems were created to directly address the OLTP use case, and they do it well.

The characteristics above imply the characteristics that a high-quality data model should have:

  • it should be clear and descriptive of the data
  • it should enforce data quality
  • it should be flexible

Clear and Descriptive

A high-quality data model should be a "picture that is worth a thousand words". You should be able to look at the data model, and figure out what the organization does. You should be able to see every person, place, thing, idea, event, and transaction that is important to the organization. The names of tables should be consistent with the language of the organization. If the organization refers to a "agreement", the table representing it should not be called "contract", "lease",  "arrangement", "accord", "pact", etc.

High-quality data models have a table for each entity (lots of tables). So each entity is identified separately and given a name. Low-quality data models have multiple entities stored in a single table (few tables). So multiple entities are combined into a single table, and hidden. They have no name, and are undocumented.

Data Quality

A high-quality data model should help to enforce that data is reasonable as it is enters the database. In a high-quality data model, each relationship represents a referential integrity CHECK constraint. This is one way that data is checked for reasonableness as it enters the database. So, a data model that has lots of relationships is checking for reasonableness in many places, and making sure "stupid errors" don't occur. 

A high-quality data model that is clear and descriptive also clarifies what accurate data should look like. A single-entity table clarifies what a reasonable record should look like. It makes it easy to define other CHECK constraints. 

A low-quality data model with few relationships has not captured all the different referential integrity CHECK constraints that could be used to maintain data quality. Furthermore, a large table that represents multiple entities makes it difficult to know what a reasonable record should look like. 

Flexibility

This is probably the most subtle, and hardest to grok without experience. 

A high-quality data model should be flexible. It should work well with all current and future systems. It should accept new features without excessive effort. It should accept bug fixes and modifications elegantly. It should not be difficult to work with from one perspective, but easy from another. In short, it should not suffer from program-data dependence. 

High-quality data models store the data in a form uninfluenced by any particular systems' usage of the data. Clear single-entity tables describe and store the data, rather than promote a particular usage of the data. Relationships describe how entities relate, regardless of systems' usage.

Low-quality data models typically impose a bias on usage of the data. When multiple entities are in a single table, the data is stored pre-JOINed in a certain manner. It is difficult to JOIN in other ways. It is also more difficult to separate one entity from an entity that it is pre-JOINed with.

Qualifications

Your mileage may vary according to your situation. Data models are not really good/bad. They have advantages and disadvantages, depending on situations.  

This is a high-level way to get a quick read on a database before digging into the details. I think it's also a good way to remain grounded in the objectives of clarity, data quality, and flexibility.


Tuesday, February 10, 2015

Fix for Zoomit.exe Error launching 64-bit version...

Had a small problem trying to get Zoomit running on a machine. It stopped working after some changes to our Group Policy in a response to a nasty virus that hit our network.

I use Zoomit frequently, and the Windows Magnifier is really not a satisfactory substitute.

Here's the error I was getting when I tried to install it:


Our tech support person found this post by Andrew Potts. It worked, but it lacked a few details that I had to work out. So I thought I would expand on it.

So it seems that running ZoomIt.exe attempts to write something into the Temp folder, which is blocked by the group policy. Apparently, this is only a problem on 64-bit machines.

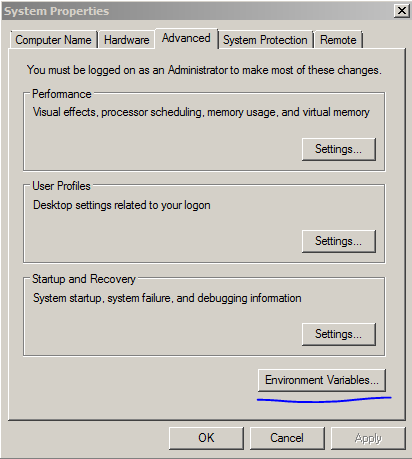
The Temp folder is defined as an environment variable, which you can change in the Control Panel under System:

Or, if you are comfortable at the command line, you can change this with the SET command:

SET TEMP=C:\temp1

So here's the exact steps that I used to fix this on my machine:

  1. get to a command prompt by running cmd under Start|Run
  2. run the command "SET" to see the current environment variables including TEMP (no command arguments, just the command SET)
  3. record the current TEMP variable value - you'll probably want to set this back to the original when you are done
  4. create a folder C:\temp1
  5. copy the ZoomIt.exe to the C:\temp1 folder
  6. run the command "SET TEMP=C:\temp1" - sets the TEMP variable to the new folder
  7. run the command "cd C:\temp1" - changes the working directory to the new folder
  8. run the command "ZoomIt.exe" - runs the installer
  9. you should now see a file "C:\temp1\ZoomIt64.exe" 
  10. run the "SET TEMP=..." command to set the TEMP variable back to its original value
You can copy this file wherever you want, or simply leave it where it is and create a shortcut to it.


Wednesday, February 4, 2015

One Way to Think About SQL Joins: It's just a WHERE Clause

When I teach relational database, I have several ways that I present the concept of joins.

One way to think about a join is that it is simply a WHERE clause.

Take the following data model from the MS Northwinds reference database. 


I've modified the data so that we can focus on a limited number of records, and see what's going on more clearly.

    SELECT  SupplierID,
            CompanyName
    FROM    Suppliers

gives:

    SupplierID  CompanyName
    ----------- ----------------------------------------
    3           Grandma Kelly's Homestead

    9           PB Knäckebröd AB
and

    SELECT  ProductID,
            SupplierID,
            ProductName
    FROM    Products

gives:

    ProductID   SupplierID  ProductName

    ----------- ----------- --------------------------------
    7           3           Grandma's Boysenberry Spread
    8           3           Uncle Bob's Organic Dried Pears
    9           3           Northwoods Cranberry Sauce
    23          9           Gustaf's Knäckebröd
    24          9           Tunnbröd

Given those tables and data, consider this statement:

SELECT   Suppliers.SupplierID,
         Suppliers.CompanyName,
         Products.ProductID,
         Products.SupplierID,
         Products.ProductName
FROM     Suppliers,
         Products
ORDER BY Suppliers.SupplierID,
         Products.ProductID   

Notice that there is no explicit JOIN statement. (So this is a CROSS JOIN) This SELECT statement returns:

SupplierID  CompanyName                 ProductID   SupplierID  ProductName
----------- --------------------------- ----------- ----------- -------------------------------
3           Grandma Kelly's Homestead   7           3           Grandma's Boysenberry Spread
3           Grandma Kelly's Homestead   8           3           Uncle Bob's Organic Dried Pears
3           Grandma Kelly's Homestead   9           3           Northwoods Cranberry Sauce
3           Grandma Kelly's Homestead   23          9           Gustaf's Knäckebröd
3           Grandma Kelly's Homestead   24          9           Tunnbröd
9           PB Knäckebröd AB            7           3           Grandma's Boysenberry Spread
9           PB Knäckebröd AB            8           3           Uncle Bob's Organic Dried Pears
9           PB Knäckebröd AB            9           3           Northwoods Cranberry Sauce
9           PB Knäckebröd AB            23          9           Gustaf's Knäckebröd
9           PB Knäckebröd AB            24          9           Tunnbröd

A CROSS JOIN gives all possible combinations of the records in Suppliers and the records in Products. Think of the database engine as saying "You haven't specified how to match up the records, so I'm assuming any record can match with any other record."

But clearly, there in the resulting combinations, some suppliers are shown next to products that they do not supply, i.e., the supplierID from the supplier record does not match the supplierID from the product record (highlighted in red below):

SupplierID  CompanyName                 ProductID   SupplierID  ProductName
----------- --------------------------- ----------- ----------- -------------------------------
3           Grandma Kelly's Homestead   7           3           Grandma's Boysenberry Spread
3           Grandma Kelly's Homestead   8           3           Uncle Bob's Organic Dried Pears
3           Grandma Kelly's Homestead   9           3           Northwoods Cranberry Sauce
3           Grandma Kelly's Homestead   23          9           Gustaf's Knäckebröd
3           Grandma Kelly's Homestead   24          9           Tunnbröd
9           PB Knäckebröd AB            7           3           Grandma's Boysenberry Spread
9           PB Knäckebröd AB            8           3           Uncle Bob's Organic Dried Pears
9           PB Knäckebröd AB            9           3           Northwoods Cranberry Sauce
9           PB Knäckebröd AB            23          9           Gustaf's Knäckebröd
9           PB Knäckebröd AB            24          9           Tunnbröd

But some suppliers are shown next to products that they do supplier, i.e., the supplied ID from the supplier record does match the supplierID from the product record (highlighted in green below):

SupplierID  CompanyName                 ProductID   SupplierID  ProductName
----------- --------------------------- ----------- ----------- -------------------------------
3           Grandma Kelly's Homestead   7           3           Grandma's Boysenberry Spread
3           Grandma Kelly's Homestead   8           3           Uncle Bob's Organic Dried Pears
3           Grandma Kelly's Homestead   9           3           Northwoods Cranberry Sauce
3           Grandma Kelly's Homestead   23          9           Gustaf's Knäckebröd
3           Grandma Kelly's Homestead   24          9           Tunnbröd
9           PB Knäckebröd AB            7           3           Grandma's Boysenberry Spread
9           PB Knäckebröd AB            8           3           Uncle Bob's Organic Dried Pears
9           PB Knäckebröd AB            9           3           Northwoods Cranberry Sauce
9           PB Knäckebröd AB            23          9           Gustaf's Knäckebröd
9           PB Knäckebröd AB            24          9           Tunnbröd

So, if we were to add a condition in the WHERE clause that enforced that only the records in green above should be shown:

SELECT   Suppliers.SupplierID,
         Suppliers.CompanyName,
         Products.ProductID,
         Products.SupplierID,
         Products.ProductName
FROM     Suppliers,
         Products
WHERE    Suppliers.SupplierID = Products.SupplierID
ORDER BY Suppliers.SupplierID,
         Products.ProductID 

Then we would get the suppliers matched up with the correct products:

SupplierID  CompanyName                 ProductID   SupplierID  ProductName
----------- --------------------------- ----------- ----------- -------------------------------
3           Grandma Kelly's Homestead   7           3           Grandma's Boysenberry Spread
3           Grandma Kelly's Homestead   8           3           Uncle Bob's Organic Dried Pears
3           Grandma Kelly's Homestead   9           3           Northwoods Cranberry Sauce
9           PB Knäckebröd AB            23          9           Gustaf's Knäckebröd
9           PB Knäckebröd AB            24          9           Tunnbröd


A Single-Record Merge Statement

The Single-Record Merge Statement

I was looking for a very simple, pared-down example of a MERGE statement to use in teaching/training. Couldn't find one, so I made this one up.

In the process, I found that getting the @@IDENTITY value out of an inserted record in a MERGE statement is not supported. You have to set up a table variable to capture the IDENTITY-created value, then move it to a scalar variable.

This makes MERGE fairly clunky, in terms of code clarity, for this use case. However, there are certainly cases where the reduced seeks might make this worthwhile.

For this example, we'll use the Northwinds reference database Products table:


So here's the desired task, written as a stored procedure without using the MERGE statement:

CREATE PROC changeProductPrice
   @productID int = NULL,
   @newPrice money,
   @newProductName nvarchar(40), 
   @newProductID int = NULL OUTPUT
AS
   IF EXISTS(SELECT * FROM Products WHERE productID = @productID) 
   BEGIN
      UPDATE Products
      SET unitprice = @newPrice
      WHERE  productID = @productID
   END
   ELSE
   BEGIN
      INSERT INTO Products
      (unitprice, ProductName)
      VALUES (@newPrice, @newProductName)

      SET @newProductID = @@IDENTITY
   END
GO

The situation is:
  • there is a Product that may or may not exist as a record in the Products table
  • if the Product already exists, we'd like to update the unitPrice
  • if the Product record doesn't exist, we'd like to add the record
  • we also want to return the productID of the product if it is a new record
This is a fairly classic issue - UPDATE if it's already there, INSERT if it isn't.

Using the Stored Procedure requires 2 seeks on the table:
  1. see if the record exists 
  2. locate the record to either UPDATE or find the location to INSERT (this might be an append if ProductID is an IDENTITY field)
See the resulting query plan:


So here's how to do it as a MERGE statement:


CREATE PROC changeProductPriceMerge
   @productID int = NULL,
   @newPrice money,
   @newProductName nvarchar(40), 
   @newProductID int =NULL OUTPUT
AS

   DECLARE @newProductIDTable table(productID int);

   MERGE  Products 
      USING (SELECT  @productID, 
                     @newPrice, 
                     @newProductName) 
               AS source ( 
                     productID, 
                     newPrice, 
                     newProductName)
      ON  (Products.productID = source.productID)
      WHEN MATCHED THEN
         UPDATE 
            SET unitprice = source.newPrice
      WHEN NOT MATCHED THEN
         INSERT ( unitPrice, 
                  productName) 
         VALUES ( source.newPrice, 
                  source.newProductName)
   OUTPUT inserted.productID INTO @newProductIDTable;

   SELECT TOP 1 @newProductID = productID FROM @newProductIDTable;
GO   

Frankly, I was hoping that the MERGE solution would be more elegant than using an IF statement to choose between INSERT and UPDATE. Don't think it ended up that way.

But this is still a very pared-down example of MERGE.

Let's go through the main parts of the MERGE statement:

  • MERGE - this is where we state which table will possibly be modified. In this case it is the Products table. This is sometimes renamed as [target] to be clear which table will possibly change.
  • USING - this is where we define the data that will be used to:
    • determine what will happen to records in the [target] (INSERT, UPDATE, DELETE, nothing)
    • used as values to make something happen in the [target]
  • ON - this must be a logical expression (evaluates to true or false), and is usually in the form of a JOIN-like expression that relates [target] and [source] records
  • WHEN MATCHED - defines the operation to occur when the expression in the ON clause evaluates to true
  • WHEN NOT MATCHED - defines the operation to occur when the expression in the ON clause evaluates to false
  • OUTPUT - used to get the data that was affected by the MERGE statement. In this case, we are using it to get the database-generated IDENTITY value
The clunky portion to all this is that the OUTPUT clause can only accept a Table (or Table variable) in the INTO portion. As a result, it's necessary to create a Table variable, @newProductTable, to hold the new IDENTITY scalar value. 

However, this is more of a declarative way to state this operation, and results in only a single seek on the Products table.

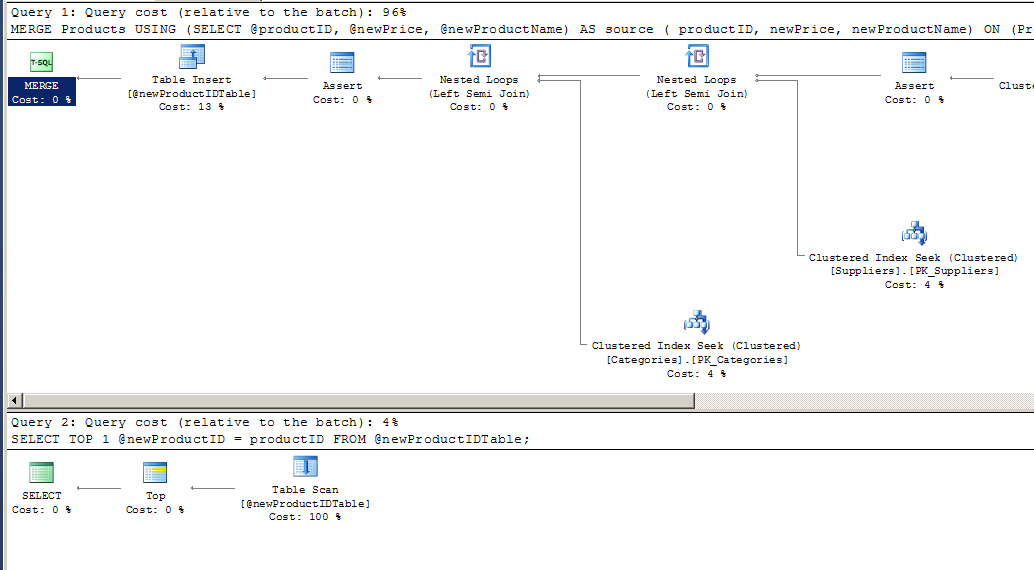
Here's the query plan for the MERGE version of the stored procedure:


There are still two separate operations, due to the clunky handling of the new IDENTITY value in a table variable. 

If the Products table were very large, and ProductID were not set as an IDENTITY field, the MERGE version might be faster. However, the MERGE version requires the instantiation of a table variable.

If we wrote this without providing the productID back as an OUTPUT, the MERGE version would certainly use only one operation.

All of this is not to say that MERGE is not helpful, but I think in this single-record situation, I'd choose the non-MERGE version for clarity.

Followers